iOS
Android
iOS
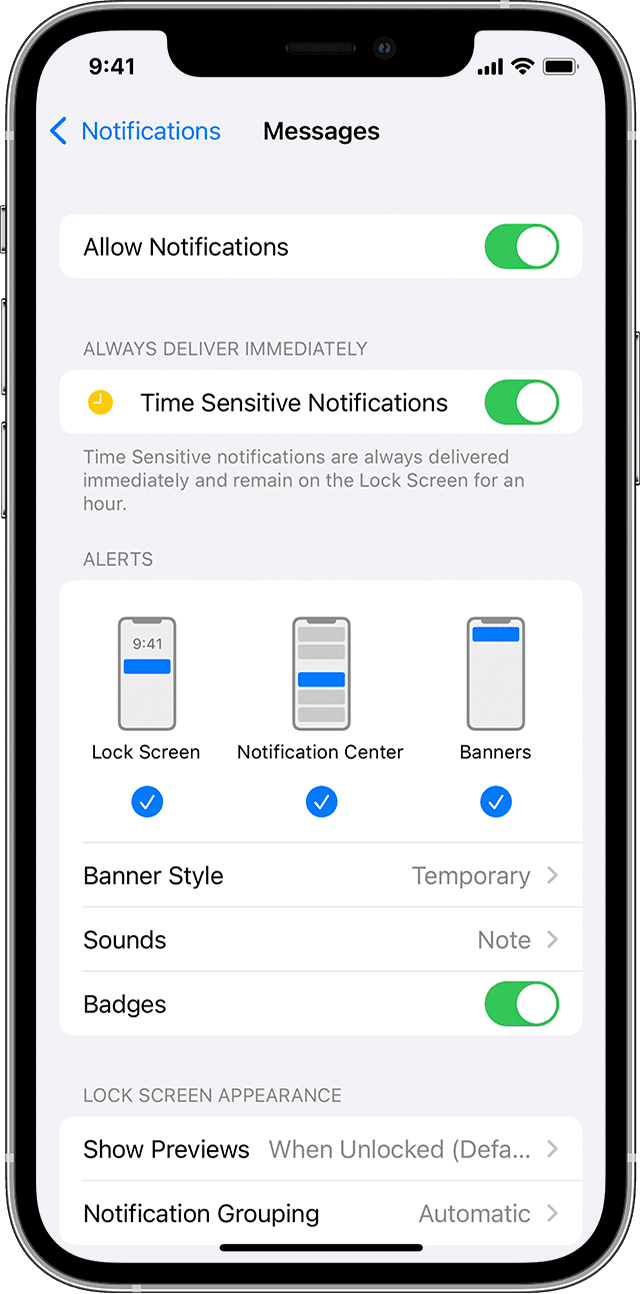
To enable Critical Alerts:
- Enter the iOS device settings on the device that will receive the Critical Alerts.
- Scroll down to the app list and tap Evertel.
- Tap Notifications.
- Tap the Allow Critical Alerts toggle to enable or disable Critical Alert
- Go to Settings and tap Notifications.
- Select an app under Notification Style.
- Under Alerts, choose the alert style you want. If you’ve turned on Allow Notifications, you can choose when you want the notifications to be delivered – immediately or in the scheduled notification summary.
- Confirm that your phone is connected to the internet.
- Your phone is not in airplane mode. Android phone Settings > Network & Internet > toggle to turn Airplane mode on and off.
- You have enabled cellular data.
- If are on a campus or corporate Wifi that has firewall restrictions in place, contact the network administrator.
- Check that your provider allows WebSocket connections.
- Ensure your Network does not have a firewall to prevent app or sites or browser types.
- Make sure that your VPN or other apps are not restricting Evertel’s ability to connect to the internet.
- Update to the latest version of Evertel Android.
- Update the Google Play services app on your phone.
- Update the Android System Webview app on your phone.
- Upgrade your Android OS to the latest version that is available for your device.
- Confirm that the date and time settings for your phone are set correctly for your time zone. Compare to the time set by https://www.time.gov/ or by https://time.is/.
- Check if the notification appears in your Android notification bar or tray.
- Check that you have enabled notifications on your phone.
- Android Settings > Apps (then Manage Apps; for some users) > Evertel > Check in Show notifications.
- Evertel’s settings> Notifications > Enable message notifications.
- Confirm you have not muted notifications for the app.
- Check if your active Evertel account on a web browser has already read the message.
- Clear the app’s cache (Clearing the app cache is kind of like a cleanse for your apps. It will get rid of residual files that could be slowing down the app).
- Open Settings> swipe to and tap Apps> Select or search for the app you want to clear> Tap Storage> then tap Clear cache.Note: The only way to clear the cache on every app at the same time would be to perform a factory reset on your phone.
- Check your device’s customized notifications:
- From Settings, tap Notifications, and then tap App notifications.
- Next, tap an app you’d like to customize.
- Next, tap Notification categories, and then tap the switch next to your desired categories to enable or disable them.Note: The available options may vary depending on the app.
- Check that you have free space in internal memory, not the SD card. You can free up space by deleting apps that are not on the SD card.
- Confirm you have enabled WiFi or cellular data while your phone is asleep. Android phone Settings > Wi-Fi > Advanced > Always keep Wi-Fi on during sleep.
- Follow steps for Android 6 above.
- Check battery settings. Android phone Settings > Battery > Adaptive preferences > turn off Adaptive Battery.
- Android phone Settings > Power management > Auto-start manager > DOWNLOADED page > select ‘Allow’ for Evertel.
- Boost+ app > Optimize background apps > Evertel > select ‘Off.’
- Android phone Settings > Apps > Apps > Evertel > Power Usage Details > App Launch > Set to Manage Manually and enable these options: Auto-Launch, Secondary Launch, and Run in Background.
- Phone Manager app > Battery manager (or Energy Saver) > Protected apps > Enable Evertel.
- Android phone Settings > Advanced Settings > Battery manager (or Energy Saver) > Protected apps > Enable Evertel.
- Android phone Settings > ‘All’ tab > Protected apps > Enable Evertel.
- Phone Manager App > Protected apps > Enable Evertel.
- Android phone Settings > Apps > Advanced/Special Access > Ignore battery optimizations > All Apps (drop down) > Enable Evertel.
- Android phone settings > Battery > Launch > Evertel.
- Android phone settings > Apps > Evertel > Data usage > Background Data > Enable.
- Android phone Settings > Notification panel & status bar > Notification center, find Evertel and activate Allow Notifications and Priority Display.
- Android phone Settings > Power manager > Background app management > add Evertel to the unrestricted list or allow Evertel to auto-start.
- Android phone settings > Battery > Background activity manager > ensure that the toggle is disabled for Evertel.
- Android phone Settings > Apps > Gear icon > Apps Auto-launch > Enable Evertel start-up in the background.
- Android phone Settings > Battery > Menu > Aggressive Doze & App Hibernation > Disable this mode or prevent Evertel from being limited in this mode.
- Android phone Settings > Apps > Menu > Auto Run > Disable this mode or prevent Evertel from being limited in this mode.
- Apps > Security center > Privacy permissions > Auto-run management (or Startup manager) > Enable Evertel.
- Android phone Settings > Application management > Running tab > Enable Everel.
- Android phone Settings > Apps > Evertel > Mobile data > Allow background data usage
- Android phone Settings > Security > Auto-start management > Enable Evertel.
- Android phone Settings > Wi-Fi > Advanced > Always keep Wi-Fi on during sleep.
- Android phone Settings > Device Maintenance > Battery > MENU > App Power Monitor > Disable or selectively choose apps to sleep from Settings > Device Maintenance > Battery. Make sure to exclude Evertel from the sleep list.
- Android phone Settings > Device Maintenance > Battery > Power saving mode > Disable ot adjust to MID.
- Android phone Settings > Battery > Detail > Evertel > Turn off.
- Apps drawer > Smart manager > Battery > Detail > Evertel > Turn off.
- Android phone Settings > Battery > Battery usage > MENU > Optimize battery usage > select ‘All apps’ > Disable Evertel.
- Android phone Settings > Battery > Unmonitored apps > Add apps > Evertel > Done > Restart your phone.
- Samsung 8: Android phone Settings > Apps > Menu > Special Access > Optimize battery usage > select the drop down which likely states ‘apps not optimized’ and switch to ‘all apps’ > find Evertel and tap on the switch to turn it off.
- Settings > Device care > Battery > More > Settings > Put unused apps to sleep > Set sleep delay to a date higher than 3
- Android phone Settings > Storage & memory > turn off the ‘Smart cleaner’ option or continue to tap the three dots at the top right > Advanced > add Evertel to the whitelist.
- Android phone Settings > Power management > Tap STAMINA mode > Apps active in standby > add Everel to the whitelist.
- Apps drawer > iManager > App manager > Autostart manager > allow Evertel to auto-start in the background.
- Apps drawer > Security app > Permissions > tap Autostart > Enable Evertel.
- Android phone Settings > Services > Security > Permissions > Autostart > Enable Evertel.
- Android phone Settings > Additional Settings > Battery and Performance > Manage apps’ battery usage > turn ‘Power saving modes’ off > open the Security app > navigate to Permissions > add Evertel to Autostart > invoke Task Manager > find Evertel > drag it downwards until the padlock icon appears.
- Android phone Security app > Settings > Data usage > Allow background data.
- Edit your VPN or firewall settings.
- Android phone Settings > More (Under Wireless & Networks) > VPN then disable Wi-Fi Assistant.
- Make sure you allow *.whispersystems.org, TCP ports 80, 443, and 31337, and all UDP. If you have a transparent or reverse proxy it needs to support WebSockets.
- Reset your Google Account.
- Android phone Settings > Applications > Manage applications > All (Swipe right on some phones for this list, if not listed in Downloaded).
- Choose Google Play services > Clear data.
- Choose Google services framework > Clear data.
- Temporarily unlink your Google account from the phone.
- Reboot the phone.
- Re-associate your Google account.
Note: The option to enable Critical Alerts in the app is available as a pop-up prompt when logging in for the first time or logging in after re-downloading the app.
To customize the alert sounds:
 Note: With iOS 15 and iPad iOS 15, you can turn on Critical Alerts so notifications come through even if your iPhone is muted or you have set up a Focus. When you use Focus*, it delays the delivery of notifications on iPhone to prevent interruptions. You can schedule a time to receive a summary of the notifications you missed.

*For more on Focus settings please read Apple’s knowledge article regarding the device feature. Click here!
Android
PLEASE NOTE: Steps to configure notifications will vary by phone model and OS. For best results, try using this resource to look up your device-specific instructions: CLICK HERE!